

Fake door testing measures real user demand for a feature that doesn't exist yet by placing a clickable entry point — a button, menu item, or pricing option — and tracking who clicks it. The feature never actually works; what you're measuring is behavioral intent, not stated preference. Use it when the core uncertainty is demand, not usability, and when you want signal before committing engineering time. The one-sentence rule: run a fake door test for early demand signal, then pair it with a higher-commitment test (prototype, pre-sales, or concierge) before you build.
Common formats:
- In-app button or menu item that triggers a reveal
- Pricing plan entry for a tier that doesn't exist yet
- Feature tooltip or "coming soon" CTA inside a workflow
- Dedicated landing page or ad driving to a waitlist
Recommended next step: Pick the format that matches where your users already are, write a hypothesis with a pre-defined pass threshold, and run it for two to four weeks before drawing conclusions.
Pro Tip: Set your success threshold before you launch. Teams that define "pass" after seeing results almost always rationalize borderline numbers upward.
Key Takeaways
Fake door testing is the fastest way to get behavioral demand signal before a single line of feature code is written — but only when the hypothesis, cohort, and reveal are set up correctly.
| Point | Details |
|---|---|
| Definition | A fake door test places a real-looking CTA for a non-existent feature and measures clicks as behavioral demand signal. |
| Primary metric | CTA CTR is the core signal; in-app, 3–5% of exposed users suggests meaningful demand, below 1% suggests low need. |
| Commitment hierarchy | Email capture is low commitment; simulated purchase click is medium; pre-order is high — interpret at the level you tested. |
| Ethical rule | Always follow up within seven days with a transparent reveal and a concrete offer (early access, interview invite). |
| Cpgagent | The Cpgagent platform provides Launch Validator, PersonaForge, and CRM-integrated waitlist capture for CPG and FMCG teams running demand experiments. |
Table of Contents
- What does fake door testing look like in practice?
- How do you design and run a fake door test?
- Which metrics should you measure, and how do you set thresholds?
- When does fake door testing add the most value?
- What are the ethical risks, and how do you reduce them?
- How does fake door testing compare with other validation methods?
- What tools do you need to run and instrument a fake door test?
- Ready-to-use test plan and KPI template
- How do you interpret results and decide what to build?
- What practitioners actually learn running these tests
- Cpgagent gives CPG and FMCG teams a faster path from test to decision
- Sources
- FAQ
What does fake door testing look like in practice?
The method goes by several names. "Painted door test" and "painted door testing" are the most common alternatives; "landing-page smoke test" overlaps when the trigger lives on an external page rather than inside the product. "Dummy door testing" appears occasionally in older lean-startup literature. All refer to the same core mechanic: a UI element that looks and behaves like a real feature but leads to a reveal instead of a working experience.
The format you choose shapes what you can infer about commitment level.
In-app button or menu item. A "Generate Report" button appears in the nav for a reporting feature you haven't built. Users who click it see a short message. This measures curiosity — the user noticed the label and wanted to explore. It's a low-commitment signal.
Pricing plan entry. A new "Enterprise" tier appears on your pricing page with a "Contact Sales" CTA. Clicks and form submissions here measure purchase consideration — meaningfully higher commitment than a nav click.
Feature tooltip or contextual CTA. A tooltip inside an existing workflow says "Try AI suggestions." Clicks here measure intent in context, which is often more predictive than a cold nav click because the user is already mid-task.
Dedicated landing page or ad to waitlist. An external page describes a product or feature that doesn't exist and asks for an email. This is the classic landing-page smoke test format. It reaches cold or warm audiences outside the product and measures interest before any product relationship exists.
As Kromatic's Real Startup Book frames it: email capture is low commitment, a simulated purchase click is medium, and a pre-order or real payment is high. Interpret results at the commitment level you actually tested.
How do you design and run a fake door test?
A well-run test takes one to four weeks and produces a clear pass/fail decision. Here's the sequence.
-
Write a tight hypothesis. Use this template: "We believe [audience segment] will click [CTA label] at a rate above [X%] because [reason]. If true, we will move to [next step]. If false, we will [archive / reframe]." The threshold must be set before launch.
-
Choose your cohort and exposure percentage. For in-app tests, start with 5–10% of the relevant user segment — enough to reach your sample-size target without exposing the entire base to a dead-end experience. For landing pages, define your traffic source and budget before you start.
-
Design the trigger and the post-click reveal. The CTA copy should describe the outcome the user wants, not imply the feature already exists. "Get early access to AI suggestions" is honest. "Use AI suggestions" implies it works now. The reveal page should be transparent, brief, and offer something of value (early access, a chance to influence the roadmap).
-
Instrument events with metadata. Log every click with user attributes: plan tier, account tenure, role, acquisition channel, and any behavioral segment relevant to your hypothesis. For landing pages, use UTM parameters on every traffic source. This segmentation is what turns a raw CTR into a useful signal, per the Defitsita test-plan rubric.
-
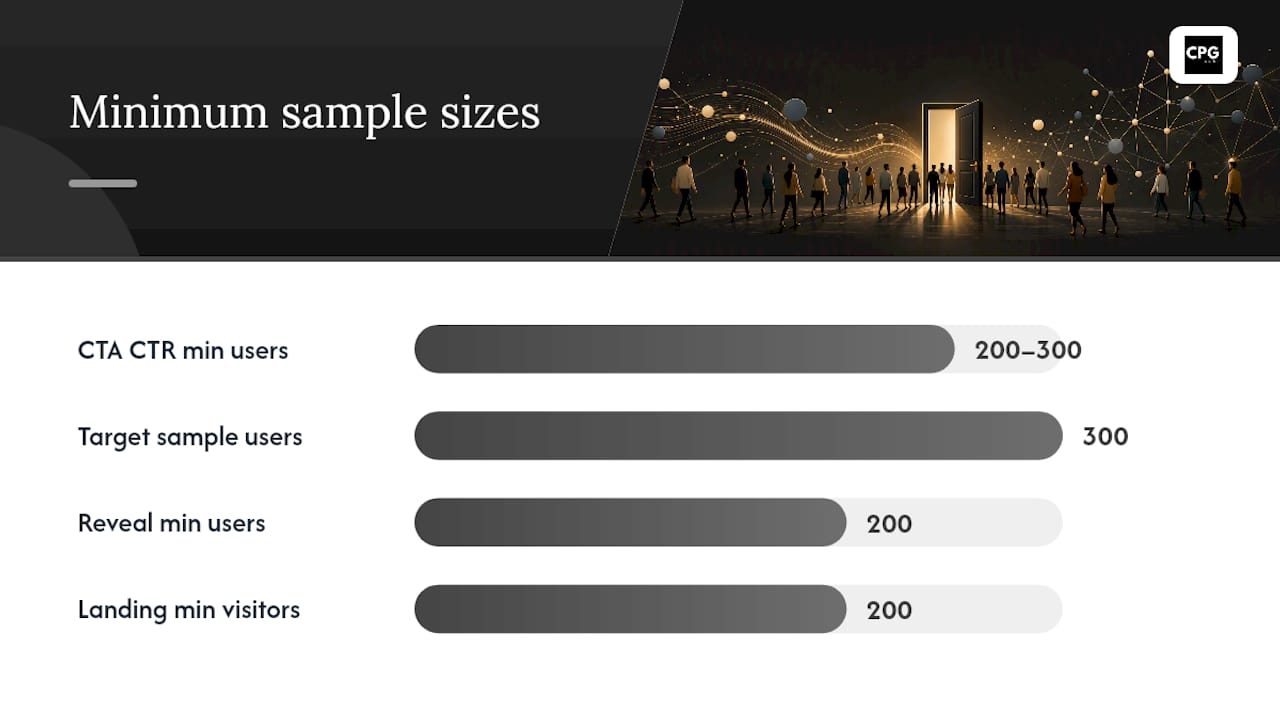
Set your run window and stopping rules. In-app tests: one to four weeks, or until you hit your sample-size target. Landing-page tests: at least two weeks, with a minimum of 200 unique cold visitors before drawing conclusions, per Bright Curios' threshold guidance. Don't stop early because the numbers look good — early peaks often flatten.
-
Close the loop. Within seven days of the test ending, message every user who clicked. Thank them, explain what you were testing, and invite them to a discovery interview or early-access list. This step is what separates a fake door test from a deceptive dead end.
Pre-launch checklist:
- Hypothesis written with audience, CTA, and pass threshold
- Experiment tracking sheet created (owner, dates, cohort size, metric definitions)
- Analytics events instrumented and verified in staging
- Reveal page copy reviewed for transparency
- Sample-size target calculated
- Follow-up message drafted and scheduled
Pro Tip: Test the reveal page with three colleagues before launch. If any of them feel misled by the copy, rewrite it. The goal is honest curiosity, not bait-and-switch.
Which metrics should you measure, and how do you set thresholds?
The primary metric is almost always CTA click-through rate (CTR) — clicks divided by unique users exposed to the trigger. But CTR alone can mislead if you don't segment it.
Primary signals (the commitment ladder):
- CTA CTR: clicks / exposed users — measures curiosity
- Waitlist or email capture rate: emails submitted / clickers — measures low commitment
- Simulated purchase click rate: "Buy now" or "Start trial" clicks / exposed users — measures medium commitment
Secondary and guardrail metrics:
- Form completion rate (did clickers finish the email form, or bounce?)
- Bounce rate on the reveal page
- Support tickets mentioning the feature name (a spike signals confusion)
- NPS or CSAT changes in the exposed cohort
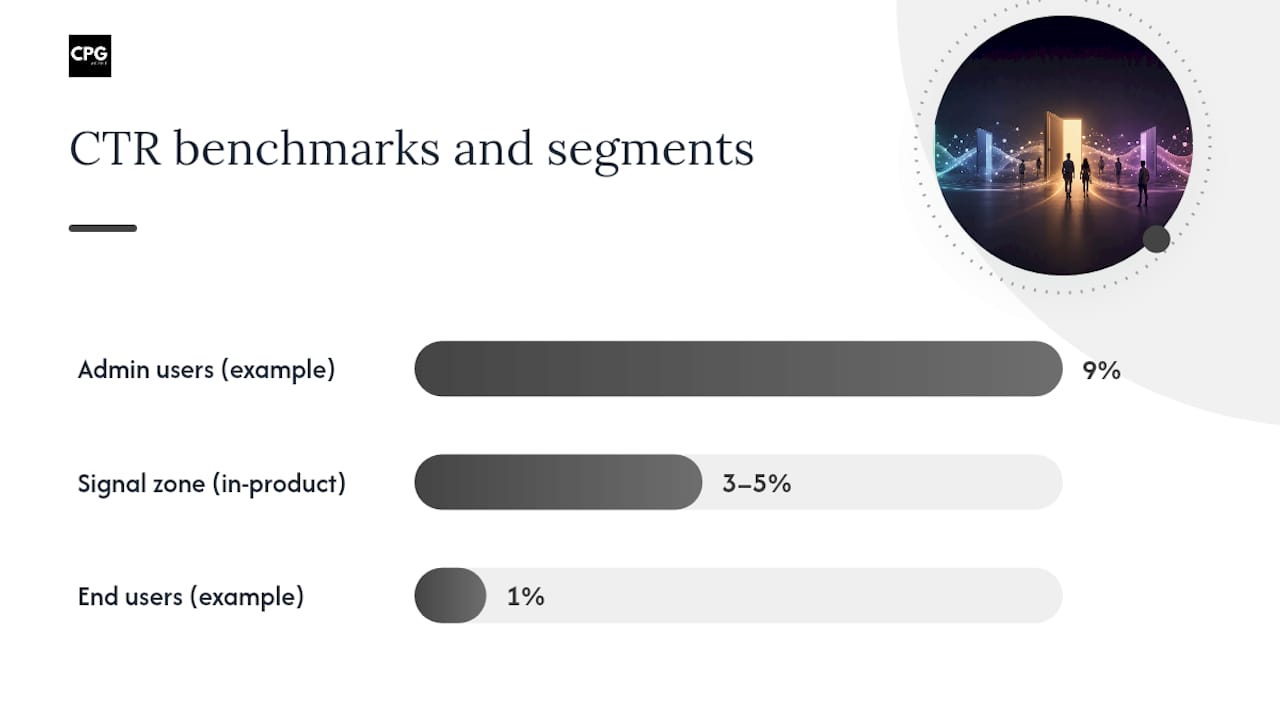
Benchmarks by context. For in-product feature triggers, UserIntuition's smoke-test guidance puts the signal zone at roughly 3–5% CTR of exposed users. Below 1% suggests the feature may not be needed, or the CTA label isn't landing. These numbers assume a reasonably relevant user segment — they don't apply to cold traffic.
For landing-page tests, channel matters enormously. A Bright Curios analysis of smoke-test thresholds makes the case that a single-number benchmark misleads decisions: cold paid social requires a higher pass threshold than warm email, because the audience is less primed. Set your threshold based on the specific channel and audience warmth, not a generic industry number.
Sample-size guidance. For in-app tests, aim for at least 200–300 unique exposed users before treating results as directional, and 300–400 for a decision you'd stake a roadmap slot on. For borderline results (CTR sits between your pass and fail thresholds), run the test longer rather than rounding up.
Segmentation is where the real insight lives. A 4% aggregate CTR that breaks down to 9% among admin users and 1% among end users tells a completely different product story than a flat 4%. Always cut results by plan tier, role, tenure, and acquisition channel before concluding anything.
When does fake door testing add the most value?
The method earns its place in specific situations. It's not a universal first move.
Use cases where it fits well:
- Validating demand for a pricing tier before building the billing logic
- Testing whether a new feature inside an existing workflow gets noticed and clicked
- Prioritizing a roadmap when two features have similar estimated effort but unknown relative demand
- Capturing pre-launch interest for a new product line before any development begins
Three short scenarios:
-
B2B admin feature. Your team debates whether admins want a bulk-export tool. You add a "Bulk Export" button to the admin dashboard for 10% of accounts and measure CTR over three weeks. A 6% CTR among admins confirms demand; you move to a discovery interview with the clickers.
-
B2C new SKU landing page. A CPG brand wants to know if a new flavor variant has demand before committing to a production run. A landing page smoke test with a "Notify me" CTA, driven by paid social, captures email signups. The conversion rate against channel-specific thresholds determines whether to proceed.
-
Pricing tier test. A SaaS team adds a "Team" plan to the pricing page with a "Get started" CTA that leads to a waitlist form. Click and form-completion rates tell them whether the price point and feature set described are compelling enough to pursue.
When not to use it:
- When usability is the main unknown (a prototype or usability test gives better data)
- When you can build a quick working prototype with low effort — Userpilot notes that vibe-coding tools have lowered the bar for quick POCs, making a fake door test less necessary in some cases
- When the audience is small enough that repeated dead-end experiences would damage trust noticeably
- When the feature involves a regulated or sensitive workflow where a non-functional trigger creates compliance risk
Pairing works well: fake door test for demand signal, then a prototype or concierge test for usability, then pre-sales for willingness to pay. Each layer answers a different question.
What are the ethical risks, and how do you reduce them?
The core tension is real. You're showing users something that doesn't work and measuring their reaction. Done carelessly, that erodes trust. Done well, it's a brief, transparent moment that users often appreciate when they understand the purpose.
Main risks:
- Users feel deceived when the CTA leads nowhere useful
- Expectation mismatch: users assume the feature is coming soon and ask support about it
- Repeated exposure to dead-end CTAs trains users to ignore new UI elements
- High-value users who click and get a bare "coming soon" page churn at higher rates
Do's and don'ts for reveal messaging:
Do: Tell users exactly what you were testing and why. "We're exploring whether this feature would be useful to you — you just helped us find out." Offer something concrete: early access, a chance to shape the feature, or a brief interview.
Don't: Show a blank "coming soon" page with no context. Don't imply the feature is nearly ready when it isn't. Don't run the same test on the same users more than once without a meaningful interval.
Mitigation tactics:
- Limit exposure to 5–10% of the relevant cohort
- Target users who are most likely to benefit from the feature (don't test on your most at-risk accounts)
- Offer genuine value in the reveal: early access, a direct line to the PM, or a short survey with a gift card
- Follow up within seven days — silence after a dead-end click is the fastest way to lose goodwill
- Log which users were exposed so you don't accidentally re-expose them in a future test
Reveal message template: "You clicked [Feature Name] — thanks for that. We're currently exploring whether to build this, and your click tells us there's real interest. We'd love to keep you in the loop. [Join the early access list / Book 20 minutes with our product team]."
Pro Tip: If your reveal message requires more than two sentences to explain why the feature doesn't work yet, your CTA copy was probably misleading. Simplify the trigger before you simplify the reveal.
How does fake door testing compare with other validation methods?
Each method answers a different question. The mistake most teams make is treating them as interchangeable.
Quick comparisons:
- Fake door vs. survey: Surveys capture stated preference; fake doors capture behavior. A user who says they'd use a feature and a user who clicks a dead-end button are not the same signal. Behavioral data is harder to collect but more predictive.
- Fake door vs. prototype: A prototype tests usability and flow; a fake door tests whether users want the feature at all. If demand is uncertain, test demand first. If demand is established and usability is the question, skip the fake door.
- Fake door vs. landing-page smoke test: These overlap significantly. A landing-page smoke test is a fake door test run on an external page, usually to cold or warm traffic. The mechanics are the same; the audience and commitment signals differ.
- Fake door vs. pre-sales: Pre-sales tests willingness to pay with real money. It's the highest-commitment signal and the hardest to run. Use it after a fake door test confirms demand exists.
Recommended sequences for common decisions:
| Decision | Recommended sequence |
|---|---|
| New feature inside existing product | Fake door (demand) → prototype (usability) → alpha release |
| New product or SKU | Landing-page smoke test → concierge test → pre-sales |
| Pricing tier validation | Fake door on pricing page → sales call → billing build |
| Roadmap prioritization | Fake door on top 2–3 candidates → highest CTR moves to discovery |
The Userpilot analysis makes a useful point: now that quick prototypes are cheaper to build, the fake door test's advantage is speed and zero engineering cost, not information richness. If you can build a clickable prototype in a day, that often gives richer data. The fake door earns its place when even a prototype would take meaningful time or when you need to test at scale inside a live product.
What tools do you need to run and instrument a fake door test?
You don't need a specialized platform, but you do need the right capabilities in place before you launch.
Required capabilities:
-
Feature flagging or experiment targeting. You need to show the CTA to a defined cohort only. Tools with feature-flag support let you target by user attribute (plan, role, tenure) and control exposure percentage.
-
Event instrumentation. Every click on the fake door CTA must fire an event with user metadata attached. Without this, you have a click count but no segmentation.
-
Analytics with segmentation. Raw event counts aren't enough. You need to cut CTR by plan tier, role, tenure, and channel. A basic analytics setup with user properties handles this.
-
Landing page and ad builder (for external tests). For smoke tests outside the product, you need a page builder that supports UTM parameter capture and connects to a CRM or email tool.
-
Waitlist capture and CRM integration. Emails collected on the reveal page need to flow into a system where you can follow up within seven days. A disconnected form that dumps into a spreadsheet works, but a CRM integration makes the follow-up cadence reliable.
Implementation notes:
- For in-app triggers: use server-side feature flags where possible to avoid flicker; fire SDK events on CTA render and on click separately so you can calculate true CTR
- For landing pages: tag every traffic source with UTM parameters before launch; capture UTM values in your form submission so you can segment by channel
- Collect only the data you need: user ID, timestamp, cohort assignment, and the metadata attributes in your hypothesis; avoid collecting sensitive data that isn't relevant to the test
- Honor user privacy preferences and opt-outs; don't expose users who have opted out of product experiments
For teams that want an integrated solution covering experiment targeting, analytics, and launch validation in one place, the Cpgagent platform brings these capabilities together with CPG-specific templates and workflows.
Ready-to-use test plan and KPI template
Copy this into your PRD or experiment tracker and fill in the bracketed fields.
Sample experiment plan:
| Field | Example |
|---|---|
| Hypothesis | Admin users will click "Bulk Export" at >5% CTR because they currently export row by row |
| Audience | Admin-role users on Pro or Enterprise plans |
| Exposure | 10% of qualifying users, randomized by account |
| Trigger | "Bulk Export" button in the data table toolbar |
| Post-click flow | Reveal page: transparent message + early access signup form |
| Primary metric | CTA CTR (clicks / exposed users) |
| Pass threshold | CTR ≥ 5% with ≥ 300 exposed users |
| Sample-size target | 300 unique exposed users |
| Run window | 3 weeks or until sample-size target is hit |
| Next steps (pass) | Recruit top clickers for discovery interviews; move to prototype |
| Next steps (fail) | Review CTA copy and audience fit; archive or reframe |
KPI reference:
| Metric | Definition | Pass threshold | Minimum sample |
|---|---|---|---|
| CTA CTR (in-app) | Clicks / unique exposed users | ≥ 3–5% | 200–300 users |
| Email capture rate | Emails submitted / clickers | A substantial portion of clickers | A sample of clickers |
| Reveal page bounce rate | Sessions with no action / total reveal sessions | Less than a majority | At least 200 unique exposed users |
| Cold landing-page CTR | CTA clicks / unique page visitors | Channel-specific | 200 unique visitors |
Thresholds for in-app CTR are drawn from UserIntuition's smoke-test benchmarks; cold landing-page minimums from Bright Curios.
Setup checklist:
- Analytics events instrumented and verified in staging
- Feature flag or targeting rule configured and tested
- Reveal page copy reviewed for transparency (no implied shipping date)
- Cohort segmentation confirmed (no overlap with other active experiments)
- Follow-up message drafted and scheduled for within seven days of test close
- Experiment sheet shared with stakeholders before launch
Pro Tip: Within 48 hours of your test closing, send a personal email (not a mass blast) to the five or ten users with the highest engagement on the reveal page. Invite them to a 20-minute call. These conversations consistently surface the specific use case that the CTR alone can't tell you — and they convert into your best beta testers.
The Evelance complete guide and Coursera's painted door overview both emphasize recruiting clickers for discovery interviews as the highest-value follow-up action after a passing test.
How do you interpret results and decide what to build?
Results fall into three zones, and each calls for a different response.
-
Clear pass (CTR at or above threshold, sample size met). Move to discovery. Recruit clickers for interviews within seven days. Don't start building yet — the fake door confirmed demand exists, not what the feature should do. A prototype or concierge test is the right next step.
-
Borderline (CTR between 1% and your pass threshold, or sample size not met). Don't round up. Run the test longer, or reframe the CTA and audience before concluding. A borderline result often means the label isn't connecting, not that demand is absent. Change one variable at a time.
-
Clear fail (CTR below 1% in-app, or well below channel threshold on a landing page). Before archiving the idea, check two things: Was the CTA visible and placed where the relevant users actually go? Was the audience segment right? If both checks pass and the number is still low, the demand signal is real — the feature isn't needed, or not by this audience. Archive with notes.
When a niche segment shows strong interest. A 2% aggregate CTR that breaks down to 12% among a specific role or plan tier is not a fail. It's a signal that the feature has a defined, smaller audience. Weigh the strategic value of that segment against the cost to build before deciding. A feature that 12% of your enterprise accounts want may be worth more than one that 4% of your entire base clicks.
Operational next steps:
- Winners: schedule discovery interviews, build a prototype, recruit an alpha group from the waitlist, and set a timeline for a real release
- Losers: document the hypothesis, the result, and the audience; share with the team so the idea doesn't resurface without new evidence; consider a messaging reframe before a full archive
The Evelance guide notes that a failed test is most useful when you diagnose why it failed — messaging, audience, or genuine absence of demand — before discarding the idea entirely.
What practitioners actually learn running these tests
Three lessons come up repeatedly when product teams run fake door tests for the first time, and they're almost never in the how-to guides.
Don't test everywhere. The instinct is to expose the CTA to the whole user base to get results faster. That's the wrong call. A broad exposure inflates your denominator with users who would never use the feature, suppresses your CTR, and creates a trust problem at scale. Target the cohort that would plausibly benefit, even if that means a slower ramp to sample size.
Instrument the metadata before you launch, not after. The most common post-test regret is "we have the click count but we can't segment it." User ID, plan tier, role, and tenure need to be attached to the event at fire time. Retrofitting this from a raw click log is painful and often impossible.
The reveal message is where most tests fail ethically. A bare "coming soon" page with no explanation is the single most common mistake. Users who click and land on nothing useful don't just feel confused — they feel used. The reveal is a relationship moment. Treat it that way.
One pattern that surprises teams: a test that "fails" on aggregate CTR sometimes surfaces a passionate micro-segment through the reveal page signups. Three users who write detailed notes in the "tell us more" field on a reveal page can be more valuable than a 4% CTR with no follow-up. The AI-powered consumer research approaches that combine behavioral signals with qualitative follow-up consistently outperform either method alone.
Speed matters, but not more than signal quality. A two-week test with a properly targeted cohort and instrumented metadata beats a one-week test with a broad exposure and no segmentation every time. The goal is a decision you can defend, not a number you can report.
Cpgagent gives CPG and FMCG teams a faster path from test to decision
Running a fake door test well requires a hypothesis, a targeted cohort, instrumented events, a reveal page, and a follow-up plan. Most teams have the intent but not the infrastructure. Cpgagent's product validation platform brings the pieces together for CPG and FMCG brands: Launch Validator for structuring demand experiments, PersonaForge for defining the right test cohort, and CRM-connected waitlist capture so follow-up happens within the seven-day window that actually converts clickers into beta testers.
The platform also includes pre-built experiment templates and fractional CMO advisory for teams that want a senior strategist to pressure-test the hypothesis before launch. No long agency retainer, no discovery phase that takes longer than the test itself.
If you're ready to run your first fake door test or want a template to drop into your PRD, visit the Cpgagent platform and start with the Launch Validator workflow.
Sources
- What Is Fake Door Testing: Methods And Best Practices
- Painted Door Test: A Method for Validating Product Ideas - Coursera
- Is Fake Door Testing Still Worth Doing in The Vibe-Coding Era? - Userpilot
- Smoke Tests for Startups: Validate Before You Build - UserIntuition
- The Landing-Page Smoke Test Done Right: Metrics, Thresholds, and What a Pass Looks Like - Bright Curios
- Fake Door Testing: Definition, Steps, and Examples - Defitsita
- Landing Page Smoke Test: Validate Demand Before You Build | The Real Startup Book - Kromatic
- Fake Door Testing: The Complete Guide | Evelance
FAQ
What is an example of a fake door test?
A product team adds a "Bulk Export" button to their admin dashboard for 10% of users; clicking it leads to a reveal page with an early-access signup instead of a working export. The team measures CTR over three weeks to determine whether the feature warrants engineering investment.
What is the difference between a painted door test and a fake door test?
They are the same method under different names. "Painted door test" is the term more common in lean-startup and business-school contexts; "fake door test" is the term more common in product management and UX communities. Both place a non-functional UI element and measure behavioral response.
What metric is most commonly measured in a fake door test?
CTA click-through rate (clicks divided by unique users exposed to the trigger) is the primary metric. For in-app tests, a CTR of roughly 3–5% of exposed users signals meaningful demand; below 1% suggests the feature may not be needed.
How is a fake door test different from a survey?
A survey captures what users say they would do; a fake door test captures what they actually do when presented with a real-looking option. Behavioral signals from fake door tests are generally more predictive of adoption than stated-preference data from surveys.
When should you stop a fake door test and move to building?
Don't move to building directly from a fake door test. A passing result (CTR at or above your pre-defined threshold with sufficient sample size) is a signal to move to discovery interviews and a prototype, not to start engineering. The fake door confirms demand exists; the next experiment confirms what to build and whether users will pay for it.